We already covered the topic "webhooks" in general with the article Incoming Webhooks: Reactions in TYPO3. Besides a general overview of the concept of webhooks, that article focuses on TYPO3 as the receiving end of a webhook of a 3rd party application with the help of the system extension reactions.
This article is about the counterpart of EXT:reactions: EXT:webhooks (see typo3/cms-webhooks at packagist.org). We'll see how to configure, customize and optimize outgoing webhooks. We can use webhooks to call 3rd party applications and let them know something happened within the TYPO3 system. To help set this up, there is a backend module in place. We also have an additional symfony component at the heart of the implementation: symfony/messenger.
Learn more about symfony/messenger in TYPO3 in the previous article Messages in TYPO3.

Why do we need a system extension for webhooks?
Well, good question.
TYPO3 offers plenty of events (read more about PSR-14 Events in TYPO3) and hooks to enable developers to alter the default behavior of the system or to implement whatever functionality they need to add at a certain occasion. This might very well be a POST request to a 3rd party application with a bunch of data about what just happened in TYPO3.
Wouldn't that be a webhook?
Yes, it would.
The system extension "webhooks" was added in TYPO3 v12 (Patch, Feature RST). It introduced a standardized way of creating webhooks and an user interface for maintaining all existing webhooks in a backend module. It takes care of the signature headers (Webhook-Signature and Webhook-Signature-Algo) and it uses the message bus (read more about the Message Bus in TYPO3) to dispatch the webhook messages.
Strictly speaking we do not need EXT:webhooks to create a webhook in TYPO3, but It certainly helps us to do it right.
Creating a Webhook to an existing Trigger
EXT:webhooks comes with several triggers predefined in the TCA. We just choose on of them to configure the rest.
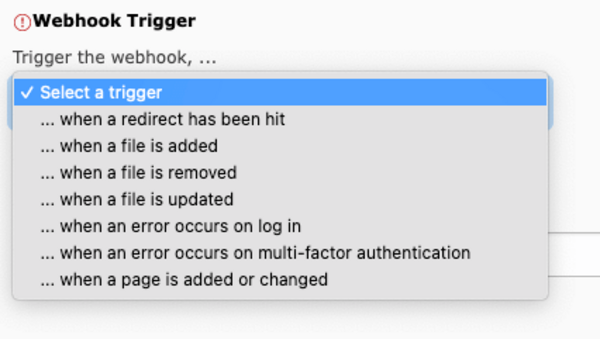
After we selected the trigger (... when a page is added or changed), we fill in the other fields of the webhook configuration. The Interface looks like this:
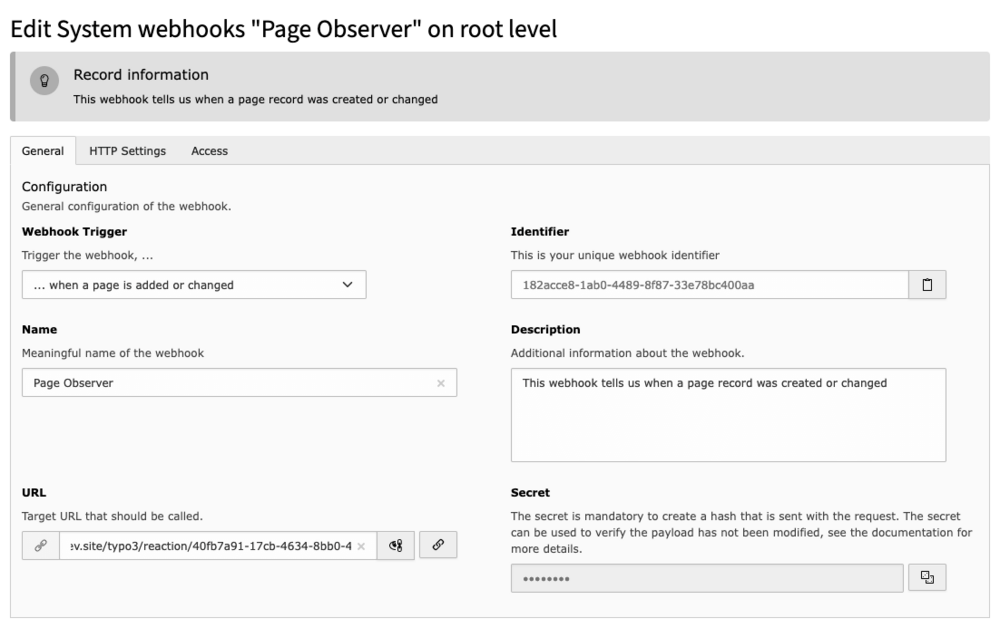
The most important field is the URL. This is the URL that is being called with the webhook data whenever its trigger occurs.
In the example, the URL is a reaction URL from the same system (learn more about EXT:reactions in the article Incoming Webhooks: Reactions in TYPO3), that simply logs the webhook payload to a file, so that we can confirm everything works as expected.
We can provide a title and a description of our webhook. Then, there are also two fields that have their contents being generated for us: identifier and secret.
Both values are used to enable the receiver of the webhook that the request was a legit call from the TYPO3 system and not forged by somebody or something else. The identifier and the secret are used in combination with the request payload (as JSON encoded string) to calculate a hash that is sent in the Webhook-Signature Header. An additional Header called Webhook-Signature-Algo is sent as well. The later contains the method that was used to create the signature hash.
The idea is, that the receiver of the webhook does the same calculation and then compares the result to the received signature to verify the request originated from the TYPO3 system.
Since we ourselves are the receiver of our webhook in our example, we can look at this in action. Here is a piece of code taken from the reaction that receives the webhook and checks the signature:
class LogRequestReaction implements ReactionInterface, LoggerAwareInterface
{
    private const WEBHOOK_SECRET = '<webhook_secret>';
    private const WEBHOOK_IDENTIFIER = '<webhook_identifier>';

    use LoggerAwareTrait;

    public function __construct(
        private readonly ResponseFactoryInterface $responseFactory,
        private readonly StreamFactoryInterface $streamFactory
    )
    {
    }

    public function react(ServerRequestInterface $request, array $payload, ReactionInstruction $reaction): ResponseInterface
    {
        if (!$request->hasHeader('Webhook-Signature-Algo') || ($algo = $request->getHeader('Webhook-Signature-Algo')[0] ?? '') === '') {
            $this->logger->error('No Signature Algo provided');
            return $this->responseFactory->createResponse()->withBody($this->streamFactory->createStream('Error'));
        }

        if (!$request->hasHeader('Webhook-Signature') || ($signature = $request->getHeader('Webhook-Signature')[0] ?? '') === '') {
            $this->logger->error('No Signature provided');
            return $this->responseFactory->createResponse()->withBody($this->streamFactory->createStream('Error'));
        }

        $hash = hash_hmac(
            $algo,
            sprintf('%s:%s', self::WEBHOOK_IDENTIFIER, json_encode($payload)),
            self::WEBHOOK_SECRET
        );

        if ($hash !== $signature) {
            $this->logger->error('Signature does not match');
            return $this->responseFactory->createResponse()->withBody($this->streamFactory->createStream('Error'));
        }

        $this->logger->info('Incoming request', ['payload' => $payload]);
        return $this->responseFactory->createResponse()->withBody($this->streamFactory->createStream('Thanks for your request'));
    }

	// Methods to fullfill the ReactionInterface
}
For this to work, the receiver of the webhook needs to know the webhook identifier (its uuid) and the secret. The values are obviously different for each webhook, so the code above just has placeholders.
The field for the webhook secret uses the new TCA type "password" (find it in the article New TCA types in TYPO3 12) so it can only be read upon creation and then never again. A new secret can always be regenerated but once a value is stored in the database, that value can never be seen again.
That data that our webhook sends is predetermined by the implementation of the TYPO3 core. When we create our own webhooks, we can freely design the payload of the webhook. But more on this later.
There is one more piece to this puzzle right now: As we know (right?), each reaction has its own secret that the incoming request must provide as the x-api-key header or the reaction will not route the request to the PHP class connected with it. Luckily, we can add custom headers to our webhook in the 2nd tab of the webhook configuration record:
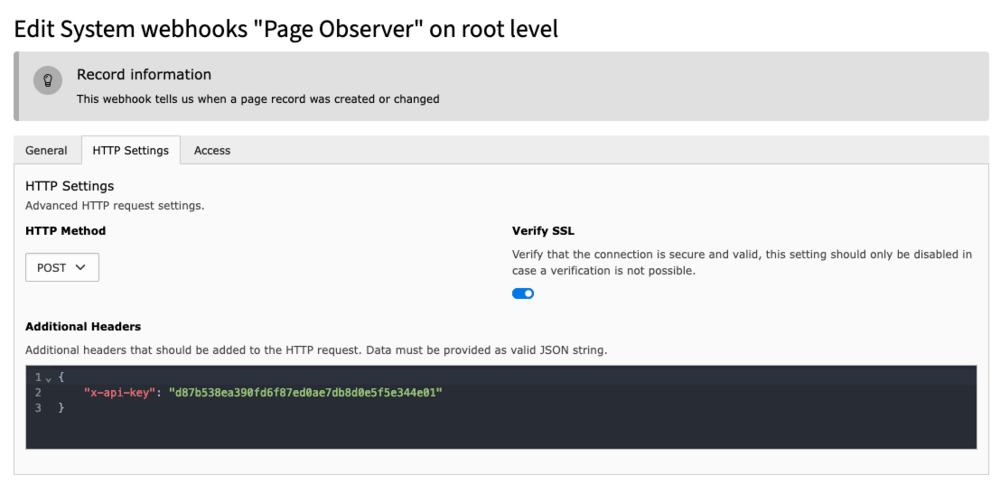
Here we could also convert our webhook to a simple GET request without any payload.
This concludes the creation of a webhook to one of the predefined triggers.
Let's move on.
How do Webhooks work in TYPO3?
To put it shortly:
- A webhook configuration record is created through the backend module and persisted to the database.
- One or more event listeners (read more about PSR-14 Events in TYPO3) check if a webhook configuration record is present for the event they are handling (e.g. the
BeforeFileDeletedEvent). - If that is the case, they create a message object and dispatch it through the message bus (read more about Message Bus and Message Queue in TYPO3).
- The message is processed by its registered message handlers, in the case of webhook messages that is at least the
WebhookMessageHandlerof EXT:webhooks. - The
WebhookMessageHandlersends out the webhook request.
The nice thing is, that webhooks use the message bus, that is based on symfony/messenger and has been introduced with TYPO3 v12 (read more about Message Bus and Message Queue in TYPO3). This means we can send webhooks asynchronously by changing the default configuration of the message bus for the WebhookMessageInterface to the doctrine transport in system.php, additional.php or any ext_localconf.php:
// Unset the default behaviour, or the webhooks will be send twice
unset($GLOBALS['TYPO3_CONF_VARS']['SYS']['messenger']['routing']['*']);

// Set Webhook-Message transport to doctrine
$GLOBALS['TYPO3_CONF_VARS']['SYS']['messenger']['routing'][WebhookMessageInterface::class] = 'doctrine';
By default, webhook messages will be dispatched synchronously. This means that the webhook is called in the same process that the trigger happened in. Since webhooks are calls to 3rd party systems and those could take a while, this has performance implications. Therefore, it is highly recommended creating a consumer for the message queue and to reconfigure the webhook message handling to be asynchronous. If you are unsure about this, please refer once again to the blog post about the Message Queue in TYPO3.
Alright, now let's create our own webhook with EXT:webhooks.
Custom Webhook in TYPO3 - Example
Adding our own webhook is made laughably simple with EXT:webhooks, because there is a lot of automagical configuration and wiring in place.
What we need to do, is find an existing PSR-14 event that we want to trigger a webhook call. If there is an event, easy game. If there is none, we have a little, but not much additional work to do. Let's see how we do it wither way.
Webhook for an existing PSR-14 Event
All we need to do, is to create the message object that will be dispatched to the message bus for us. here is an example:
#[WebhookMessage(identifier: 'dg/cache-flushed', description: '... when the cache was flushed from CLI')]
final class CacheFlushMessage implements WebhookMessageInterface
{
    public function __construct(private readonly array $groups)
	{
    }

    public static function createFromEvent(CacheFlushEvent $event): self
    {
        return new self($event->getGroups());
    }

    public function jsonSerialize(): array
    {
        return ['groups' => $this->groups];
    }
}
That's it. That is all we have to do.
The PHP attribute WebhookMessage registers our class as a message for the message bus (Feature RST). The WebhookMessageInterface makes sure, that the correct message handler picks it up. The createFromEvent() method automagically registers an event listener that dispatches the message object to the message bus . Finally, the jsonSerialize() methods provides the payload for the webhook request as JSON. Note that this method is mandatory, because the WebhookMessageInterface extends the PHP interface \JsonSerializable.
I'd say this is a very elegant way of adding a webhook.
Our hands become a little bit more dirty when we want a webhook triggerd and there is no event yet.
Webhook without a PSR-14 Event
If we find ourselves in a situation where we want to implement a webhook, but the core or 3rd party extension we need to trigger it, does not provide a PSR-14 event, we should suggest that such an event should be added. That being said, we need some way of interfere with the application code and if there is no event, there probably is a hook. For hooks, we register to it as we are use to (read more about Hooks in TYPO3) and then in our class we create our message object and dispatch it via the message bus.
Here is an example for this as well:
public function __construct(protected readonly MessageBusInterface $bus)
{
}

public function method_calledByAHook(array $arguments)
{
    $message = new MyWebhookMessage($arguments);
    $this->bus->dispatch($message);
}
In this case, the message object MyWebhookMessage does not need a createFromEvent() method, because ... well, it is not created from en event.
This is pretty much everything, we need to know about webhooks in TYPO3. Please remember to use the message queue and a queue consumer for the webhooks.
Kudos to everyone involved in bringing this to TYPO3 and thanks to everybody reading and especially everybody supporting the blog.
Cheers.
Further Information
- Feature: #99629 - Webhooks - Outgoing webhooks for TYPO3 - Official Change Log entry for TYPO3 v12
- messenger_example, TYPO3 extension to showcase a custom webhook