"Doing templating right" is a topic of discussion in the TYPO3 world since basically the very beginning. Although it is theoretically possible to specify the complete markup of a TYPO3 website in TypoScript, developers will quickly agree that markup rather comes from dedicated HTML templates. Therefor there were (and still are) countless approaches for mapping the content that is edited in the backend to some kind of HTML template for proper frontend output. Let's look at a few of them real quick, before we look at the Backend Layout approach in Detail:
History and Alternatives
- The old school marker (
###MAIN_CONTENT###) and subparts (<!-- ###METANAV### Start -->) approach combines a somewhat ugly static HTML template full of###with a matching TypoScript configuration. If you want to find out more, read the documentation.
- A likewise approach was implemented with one of the early day extensions: automaketemplate. Being first published by Kasper Skårhøj himself, automaketemplate is kept compatible with every LTS releases ever since and can be still used today (and most likely is). The extension allows for mapping TypoScript Objects to HTML elements in a specified static template by their IDs (
<div id="main-menu"></div>). Read the documentation of the extension for more information.
- The infamous extension TemplaVoila brought an interface for mapping TypoScript Objects to Template Parts to the backend alongside a modified Page Module that was able to represent the template layout to a certain degree. However most of the relations and the configuration was stored in a giant XML construct in the database and therefore it was causing pain and agony upon developers. It had its upside for editors and was widely used during the TYPO3 4.5 era. It is still present and as of now the latest TER release supports TYPO3 7 LTS. Read the documentation of the extension for more information.
- A more modern and of course different version is the extension fluidpages. Fluidpages belongs to the FluidTYPO3 ecosystem and it is making heavy use of (who would have guessed it) fluid templates. It enables the configuration of the page module layout as well as the frontend output in the same template using ViewHelpers. It is compatible with every LTS version since its initial release and will most likely be compatible with the next LTS releases of TYPO3 as well.
This should be enough "history" on the templating topic for now. Please note that I personally do not recommend using the first three approaches and consider them outdated. I personally use fluidpages in quite some projects and I do think it is totally fine. However I will focus on a fifth solution for the rest of the post: Backend Layouts.
Why Backend Layouts?
First of all let us quickly define what we mean by "Templating with Backend Layouts". A Backend Layout is concerned with the appearance of the page module in the TYPO3 backend. Until TYPO3 8 LTS four columns are shown here by default: Left, Normal, Right and Border. During the development of TYPO3 9.0 the out of the box default was changed to display only the column Normal (see the Patch and the Important.rst).


Sometimes the columns of the page module do not match the frontend layout of the website and therefore different Backend Layouts can be defined to alter the appearance of the displayed columns to better represent the frontend. To let the selected Backend Layout of a page also affect the frontend rendering we map it to a matching fluid template.
With TYPO3 6.2 LTS so called data providers for Backend Layouts were introduced to the core (see the Patch). A feature that during the development of TYPO3 7 LTS was used to add a PageTsBackendLayoutDataProvider on top of it (see the Patch and the Feature.rst). This functionality (formerly supplied by several extensions) allows us to provide Backend Layouts with pure pageTSConfig. Before this the only way to configure Backend Layouts that was supported by the core were the Backend Layout database records. But with the PageTsBackendLayoutDataProvider the configuration could be supplied without depending on the database.
To sum this up: what are the advantages?
- Configuration and selection of Backend Layouts are core features. So no third party extension is required.
- No database records are required (the selection of a Backend Layout for a page or a pagetree is still stored in the database, though).
- The whole configuration and templates are flawlessly deployable.
- The full power of fluid can be used in the templates.
- Since we are rendering our page with a FLUIDTEMPLATE TypoScript object we can use DataProviders as well as assign variables and settings.
Provide Backend Layouts with Page TSConfig
We want to use page TSConfig to provide our Backend Layouts.
The official documentation on how to include TSConfig in a TYPO3 project can be found here.
I recommend putting every Backend Layout configuration in its own file and to name that file after the Backend Layout identifier to keep everything nice and clean. For example, I put my Backend Layouts for this Blog under my_ext/Configuration/TSConfig/PageTSConfig/BackendLayouts:
tree my_ext/Configuration/TSConfig/PageTSConfig/BackendLayouts
my_ext/Configuration/TSConfig/PageTSConfig/BackendLayouts
├── Folder.tsconfig
├── Home.tsconfig
└── Post.tsconfig

0 directories, 3 files
Note that the folder structure and file endings are following this decision.
Let's look at the Configuration that sits inside the Post.tsconfig next:
mod.web_layout.BackendLayouts {
  post {
    title = LLL:EXT:my_ext/Resources/Private/Language/locallang.xlf:backendLayout.post
    icon = EXT:my_ext/Resources/Public/Images/BackendLayouts/Post.png
    config {
      backend_layout {
        colCount = 1
        rowCount = 2
        rows {
          1 {
            columns {
              1 {
                name = LLL:EXT:my_ext/Resources/Private/Language/locallang.xlf:backendLayout.post.columnName.teaser
                colPos = 10
              }
            }
          }
          2 {
            columns {
              1 {
                name = LLL:EXT:my_ext/Resources/Private/Language/locallang.xlf:backendLayout.post.columnName.content
                colPos = 0
              }
            }
          }
        }
      }
    }
  }
}
Let's go through this example and explain the parts.
- Line 1: Every Backend Layout has to be put in
mod.web_layout.BackendLayouts - Line 2: This is the identifier of the Backend Layout. Keep it unique!
- Line 3 & 4: The title and icon that are shown in the page properties when selecting a Page Layout
- Line 5-28: The configuration of the Layout. Multiple lines and rows are supported. The example is quite simple and only contains two columns that are rendered one below the other. More complex structures are possible. More on this in a moment.
- Line 14 and 22: The
colPosfor each column. Obviously this has to be unique within a single Backend Layout configuration.
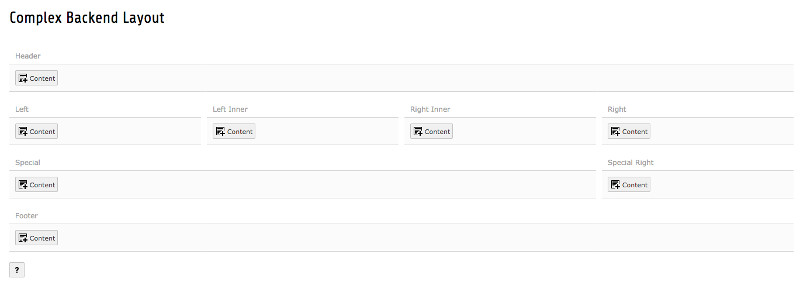
So how does this look when selected in the Backend?

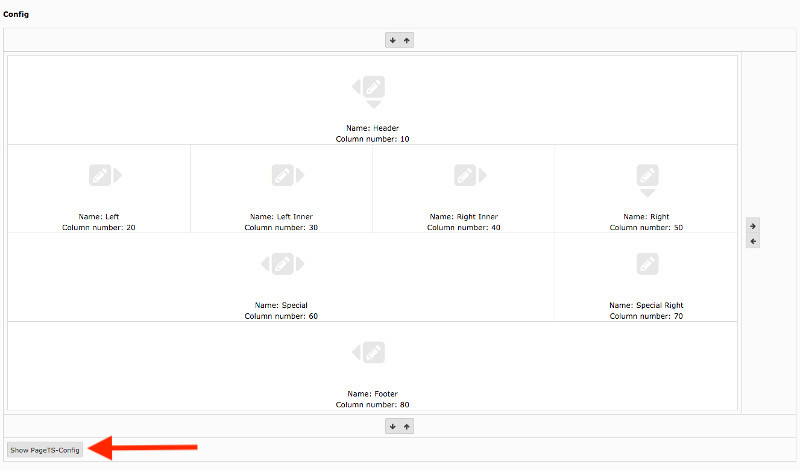
For more complex structures the Backend Layout record interface in the TYPO3 backend can be used as it contains a user friendly wizard for generating and configuring the grid for the Backend Layout. When we are done configure our Layout there, we can simply export the complete PageTSConfig (button marked with an arrow on the following screenshot) and only have to adjust the identifier, title and icon.
Here is an example for that:


Don't forget to actual include the backend layout PageTSConfig in your configuration!
Now all that is missing is mapping a selected Backend Layout to a fluid template where we render the content.
Mapping Backend Layouts to Fluid Templates
The PageTsBackendLayoutDataProvider takes the identifier of a Backend Layout and prepends pagets__ so that a selected Backend Layout that was provided by PageTSConfig will get stored as pagets__<identifier>, so e.g. pagets__post. We can now declare our page to render a FLUIDTEMPLATE TypoScript object (page.10 = FLUIDTEMPLATE) and then switch the template name depending on the pagelayout for the current page. The pagelayout shortcut to be used in TypoScript was introduced with TYPO3 7.5 to specifically ease the handling of Backend Layouts for the frontend (see the Feature.rst). It contains the current Backend Layout while taking inheritence of Backend Layouts to subpages into account.
The TypoScript looks like this:
page = PAGE
page {
    10 = FLUIDTEMPLATE
    10 {
        layoutRootPaths {
            10 = EXT:my_ext/Resources/Private/Layouts
        }

        partialRootPaths {
            10 = EXT:my_ext/Resources/Private/Partials
        }

        templateRootPaths {
            10 = EXT:my_ext/Resources/Private/Templates/Page
        }

        templateName.stdWrap.cObject = CASE
        templateName.stdWrap.cObject {
            key.data = pagelayout

            default = TEXT
            default.value = Default

            pagets__home = TEXT
            pagets__home.value = Home

            pagets__post = TEXT
            pagets__post.value = Post
        }
    }
}
This configuration already takes into account the fallback to a BackendLayout selected on a parent page for its subpages. Also a fallback for no specified matching Backend Layout is defined (Default.html). This is basically it. Now we only need to render the content from the matching colPos at the correct place in the template by using fluids CObjectViewHelper or a dedicated ViewHelper for content rendering like e.g. contained in the extension VHS.
An alternative configuration for mapping the selected Backend Layout to a template name for a fluid template comes from the TYPO3 Core Team member Benjamin Kott and his famous bootstrap_package (check it out on GitHub):
templateName {
  cObject = TEXT
  cObject {
    data = pagelayout
    required = 1
    case = uppercamelcase
    split {
      token = pagets__
      cObjNum = 1
      1.current = 1
    }
  }
  ifEmpty = Default
}
This smart configuration takes the selected Backend Layout string from the pagelayout function, removes the prepended pagets__, then sets the first character of the remaining string to upper case and uses this as the template name. With this configuration new Backend Layouts and matching fluid templates can be added to a system without adding anything to the TypoScript configuration. All credits for this solution go to Benjamin Kott, who explains the whole subject in this YouTube video:
Rendering the Content in the Template
Just for the sake of completion we include an example for rendering content from a specified colPos in a fluid template. For this we create a little TypoScript configuration (lib.content) and then use the CObjectViewHelper to render this TypoScript object. First lets have a look at the TypoScript:
lib.content {
    render = CONTENT
    render {
        table = tt_content
        select {
            orderBy = sorting
            where.cObject = COA
            where.cObject {
                10 = TEXT
                10 {
                    field = colPos
                    intval = 1
                    ifEmpty = 0
                    noTrimWrap = | AND colPos=||
                }
            }
        }
    }
}
Note that this configuration can be expanded and altered as the usecases differ from project to project. As a second example we can look at the bootstrap_package again.
In our fluid template this can be used like the following:
<div id="header">
  <f:cObject typoscriptObjectPath="lib.content.render" data="{colPos:10}" />
</div>
<div id="content">
  <f:cObject typoscriptObjectPath="lib.content.render" data="{colPos:0}" />
</div>
Now we covered all the pieces to implement a frontend layout in TYPO3 by using Backend Layouts. You should be set up to use this technique in your own projects!
Bonus: content_defender
Former TYPO3 core team member Nicole Cordes published an extension called content_defender (TER, Github).
The extension makes it possible to configure the CTypes that are allowed in each column of any Backend Layout to restrict editors to a fixed list of content elements. The expanded configuration for a Backend Layout column with content_defender installed can look like this:
columns {
  1 {
    name = A column with restricted list_type and "normal" CType
    colPos = 3
    colspan = 6
    allowed {
      CType = textmedia, list
      list_type = ,news_pi1
    }
  }
  2 {
    name = Column without divider, plain html and table elements
    colPos = 3
    colspan = 6
    disallowed {
      CType = div, html, table
    }
  }
}
For more information please refer to the extension manual or the Readme.md on GitHub. Also, let me point you to Nicoles Github Sponsors where you could support her as a TYPO3 extension developer.
Thank you for reading and happy templating!
